
LabJack T4 for production test of embedded systems
Case Study with ThermoDart
Introduction & Disclaimer
This document is intended for engineers and electronics developers who are interested in taking their automated testing to the next level. LabJack data acquisition hardware can be used for countless applications including automated testing and validation of a wide array of electronic components and systems. This should serve as a detailed endorsement of LabJacks capabilities, a guide for ambitious engineers and finally encouragement to check out our friends at ThermoDart. They make an awesome new product that deserves consideration for any past LabJack-Digit customers or anyone who needs a pure data logger especially for beverages, bottled liquids, pasteurization, food processing and more. LabJack and ThermoDart have no affiliation or partnership. None of the links are affiliate links. The engineers at ThermoDart have written the following article that we are pleased to share with our LabJack users.
Overview
You have a new PCB board design which is ready for small batch production, but how do you ensure that your first units will work? How do you program them? What sort of tests will you run on the board, and how do you perform these tests in a cost-effective manner? As an experienced engineer who’s worked on dozens of such embedded systems, the device we prefer to use for this application is a LabJack. Why? Because LabJack offers a good mix of I/O capability, software flexibility, and performance, all at a cost which makes it possible to instantiate several copies of the system without breaking the bank.
What sort of tests will you run on the board, and how do you perform these tests in a cost-effective manner?
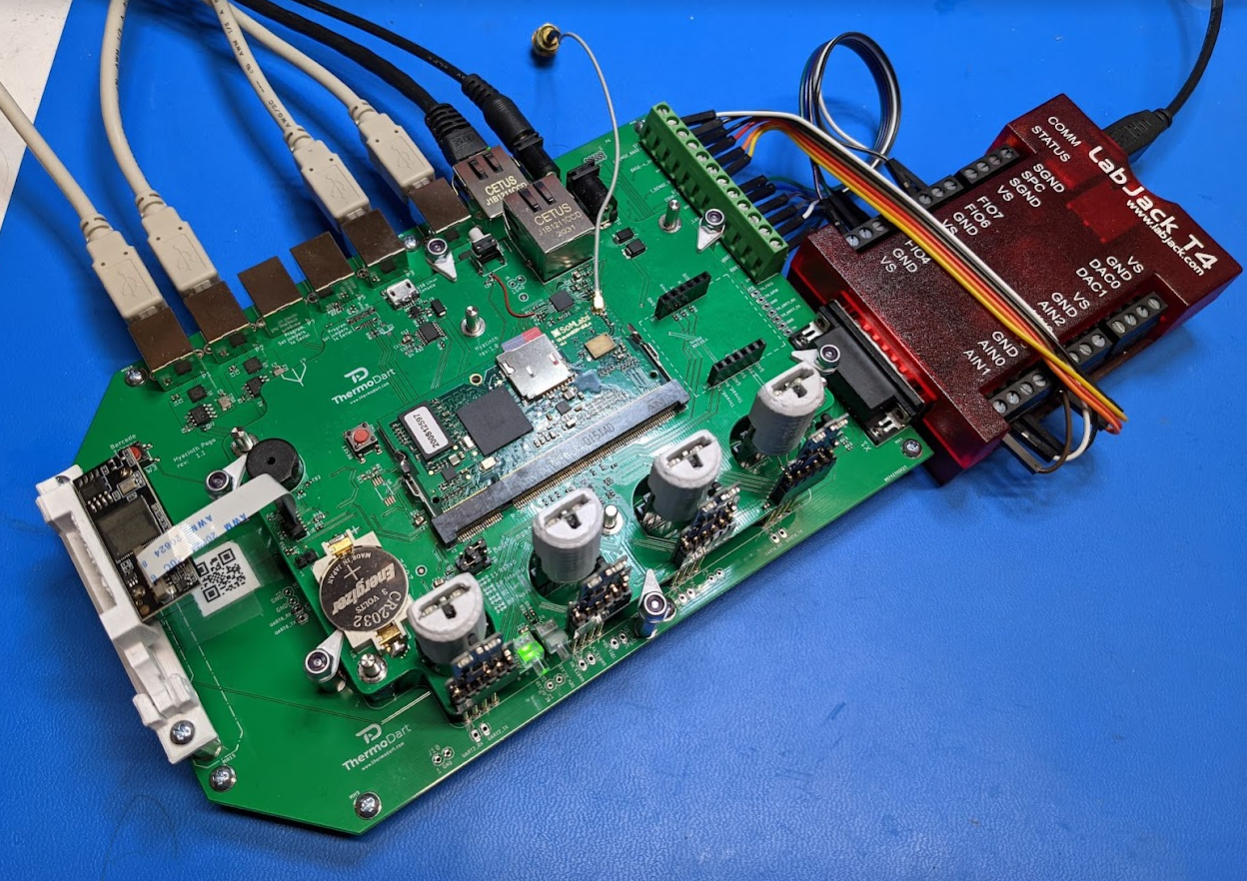
Figure 1: LabJack T4 and bed of nails test board, with ThermoDart device under test (DUT) attached.
Any skeptical engineer might ask “can’t you just use an Arduino, Raspberry Pi or BeagleBone?” Yes you could but there are clear advantages to using professional hardware like LabJack.1 These products overlap in market share, but you get a head start with LabJack for this specific application. Keep in mind that total cost includes the software and hardware engineering effort, as well as sustaining costs. While the open source Pi and Arduino community and message boards are great, nothing can replace LabJacks legendary support and detailed documentation.
1 At time of publication (Summer 2022) these platforms are hard to find and 3-5x normal cost negating most or all cost savings.
Design Process
The following is a short example of what goes into the design of one of these bed of nails test systems.
Pick some I/O
Start with a list of things that need to be tested, and then assign them to some I/O on the LabJack. The tables in LabJack datasheets make this easy, see the example T4 DIO mapping below.

Figure 2: LabJack T4 digital IO mapping
Each function will typically have some test point on the bed of nails, and it’s easy enough to map these test points to I/O on the LabJack, like below (abbreviated).
Table 1: Example hardware pins mapped to LabJack I/O
Note: As a rule of thumb, if device under test (DUT) output voltages are greater than 5V, you may need to add voltage dividers to your custom bed of nails PCB, or use a LabJack accessory. For DUT control voltages >5V, we have found that it’s straightforward to add in an external power supply with a relay that’s controlled by the LabJack. If there’s any doubt on interface voltages or compatibility, LabJack Support Engineers (live chat, email or phone) will be happy to direct you to the relevant documentation.
After you have finalized the list and locations of test points, voltages, and general test conditions, you can proceed with bed of nails board design and fabrication.
A bed of nails will generally have pogo pins soldered to a PCB, like below.

Figure 3: Simple bed of nails test PCB, image credit ThermoDart.
A PCB will do the job, but for higher volume production (>10,000units/year) you’ll want to upgrade the chassis to something more durable, including quick release hardware, etc.
Collect Hardware
You need hardware to perform programming, stimulation, control, and performance monitoring of the Device Under Test (DUT).
- DUT, including PCB test points
- LabJack T4, T7, accessories etc.
- A power supply
- Bed of nails custom PCB
- Miscellaneous specialized equipment, daughter cards, a USB port, etc.
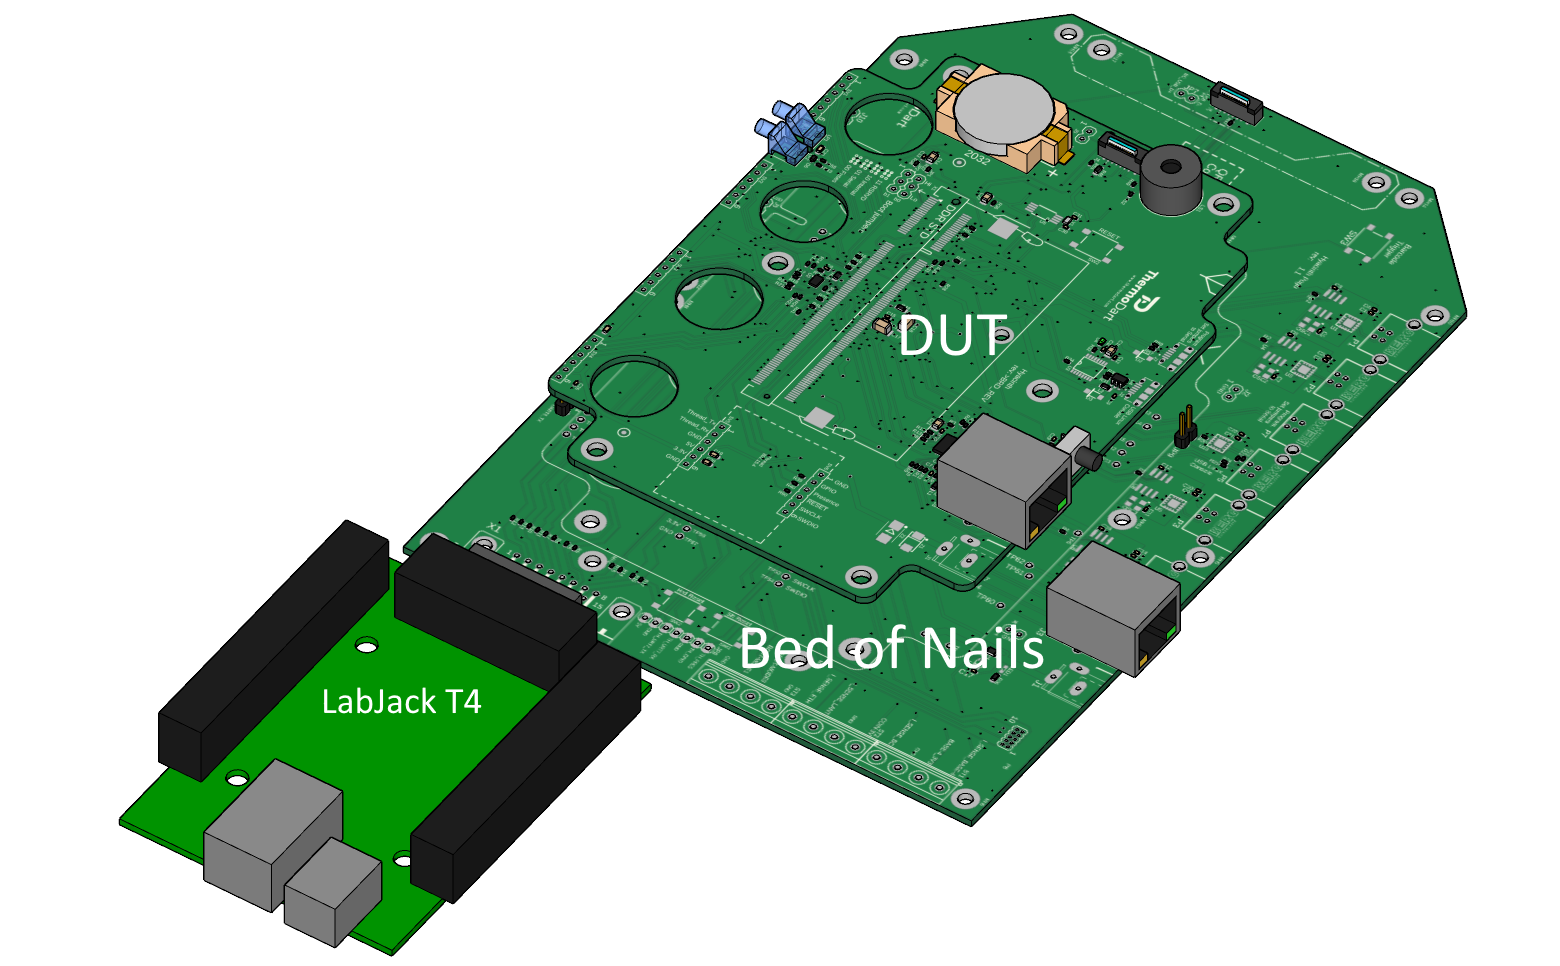
Figure 4: Typical hardware test setup
Essentially the goal is to automate any checks you perform with a DMM when you do board bringup. The LabJack is acting as a USB DMM with a programmable interface, so nearly anything you can do by probing around on your board should be possible with a LabJack and a few lines of code.
Test Program Code
You will need to write some custom code in order to exercise the DUT. Usually the list of test program goals is something like the following. You can write a test program in any language, but at ThermoDart, we like to use Python or LabVIEW.
Typical Goals
- Serialization & programming
- Verify nominal supply current2
- I/O checks; communication, LEDs
- Modes; such as entry and exit from sleep
- Behavior on power loss or boot
- Calibration
- Records of serialization, performance data, calibration traceability
2 Consider adding a current sense amplifier like an INA190 to your bed of nails. It will provide insight into DUT operation, and 100x amplification of shunt voltage means very little impact to line voltages.
The LabJack is a cost effective tool to realize goals 2 through 5. In some cases it can also handle calibration, depending on the accuracy needed.
Benchtop tools like o-scopes, power supplies, and even very capable USB tools like Saleae tend to have complicated, proprietary, or restrictive APIs, such that it can be a hassle to wrap them into your custom test software. Moreover, a LabJack has both inputs and outputs, so it’s great when you need both.
The following examples are simple excerpts from the test code that tests a ThermoDart BASE-4 baseboard.
Ex: Check a voltage
With a LabJack, I can monitor a voltage on my DUT with just a few lines of Python code.

Figure 5: Code to read an analog input on a LabJack
Once you become familiar with their address system, and perform lookups with the associated modbus map, it’s trivial to write a function like the one above.
Ex: Toggle an active low, hi-z switch input
Some other DAQ tools give you the ability to change an output state, but they don’t give you much control over which state is the “active” state. Whether you’re dealing with active high, active low, or push-pull type signals, LabJack can handle all of the permutations with some simple commands.

Figure 6: Active low control
Ex: Get ambient temperature
Oftentimes it’s helpful to know the test jig temperature, and this is a simple one liner.

Figure 7: Code to read ambient temperature
Finalize your program
The bulk of the program complexity will come from making a UI, and backend infrastructure for serialization. The simple part is exercising the LabJack.
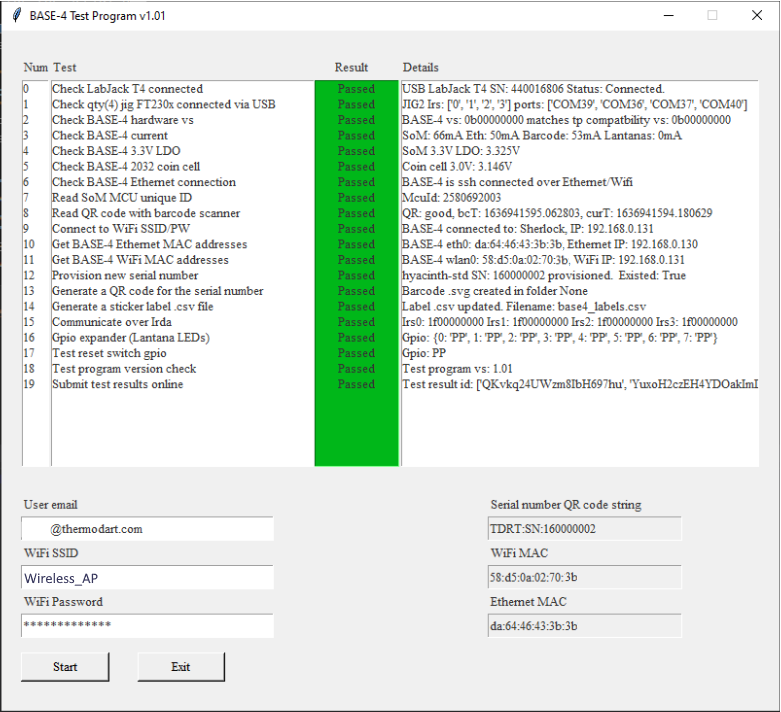
Figure 8: A simple Python test program GUI using Tkinter.
Build a few copies
You’ll need a few copies of the test setup, so your manufacturer has a spare, and you have one or two local copies for internal testing and validation. This is where cost becomes a bigger driver than you might initially imagine. ThermoDart uses an OEM LabJack T4 integrated into a 3D printed housing to test all of its TD104 products.
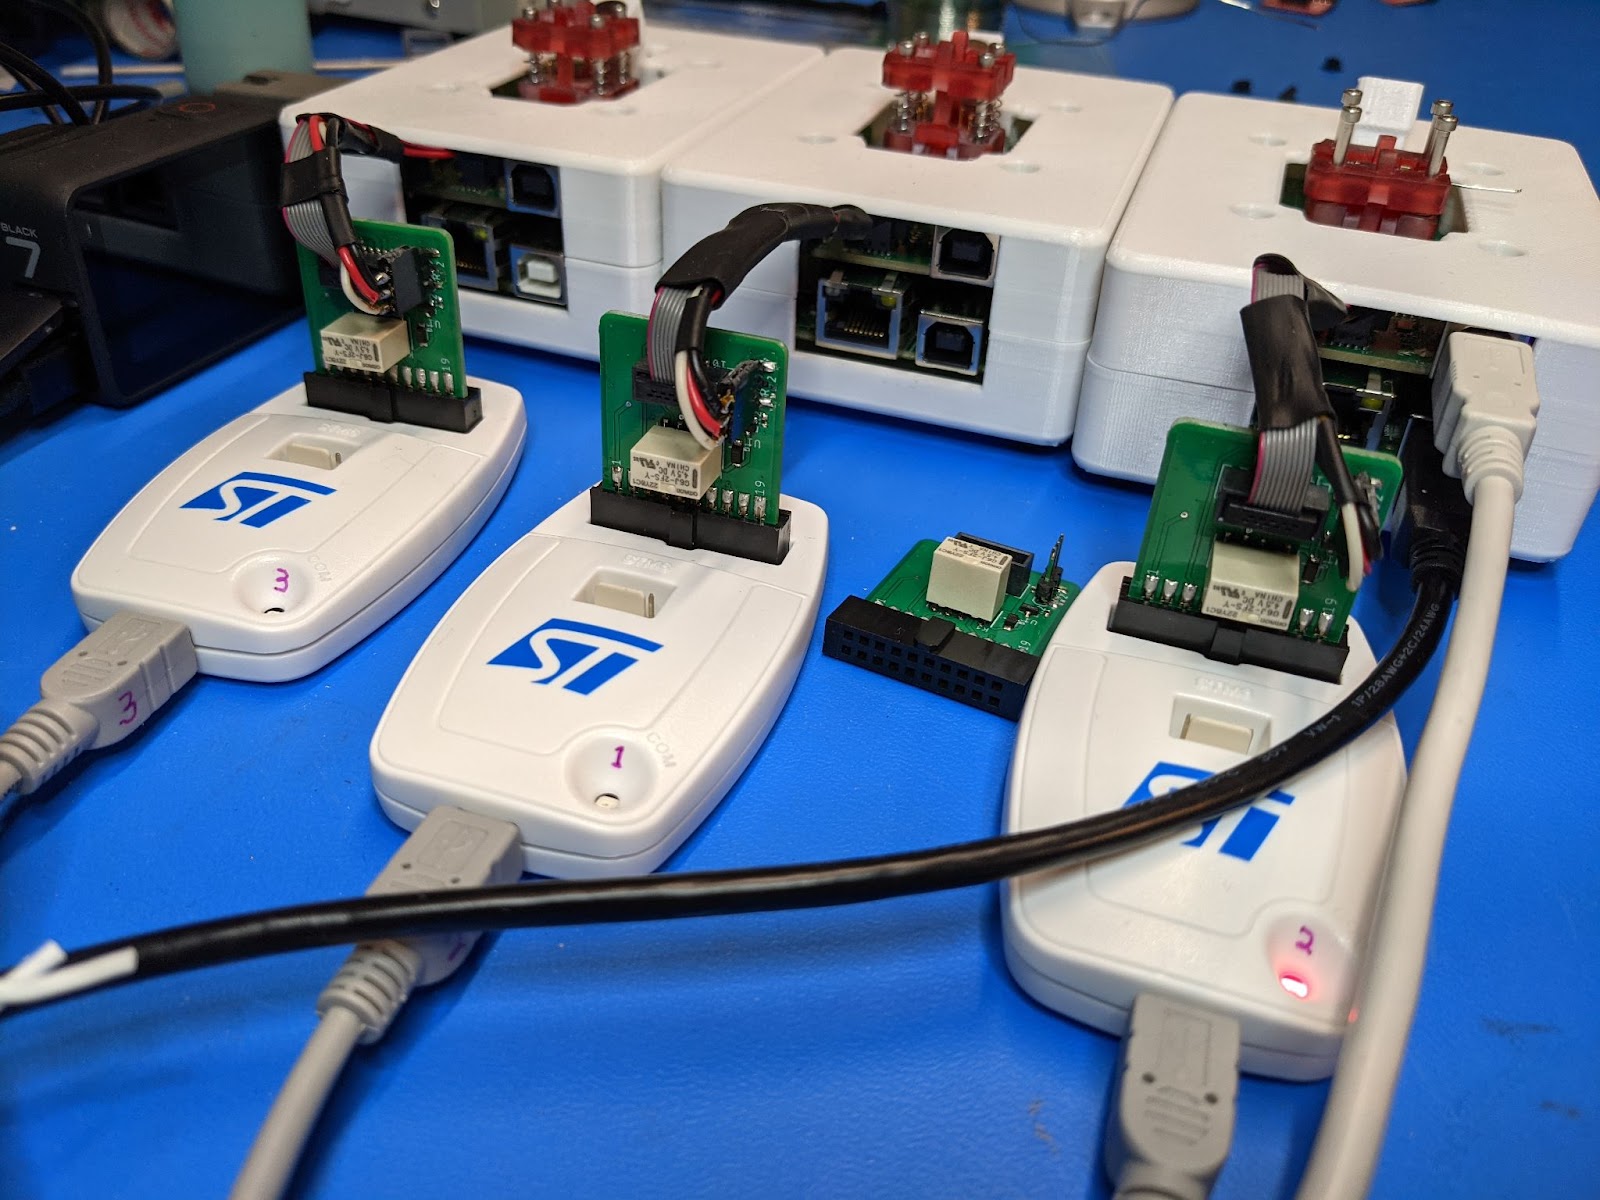
Figure 9: Three test fixtures with ST programmer, OEM LabJack T4, and custom bed of nails PCB.
The above image shows another custom jig that uses an OEM T4 in a sandwich configuration with the pogo board for a more integrated package. The image below shows how the LabJack T4 stacks into the enclosure. The T4 mechanical drawings were straightforward to build from.
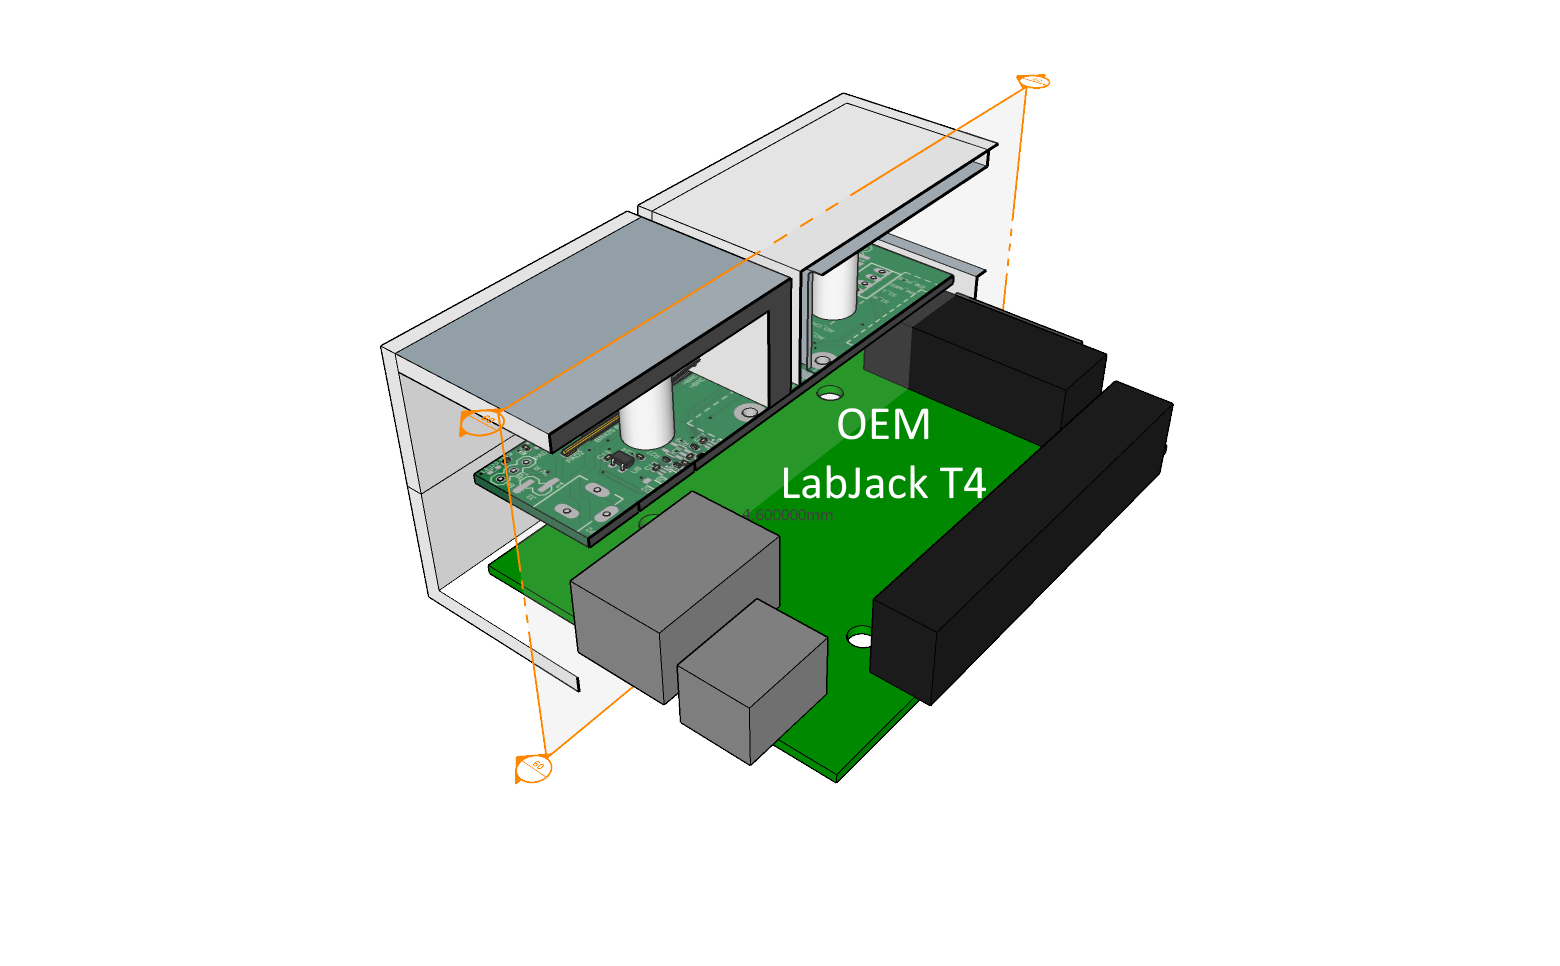
Figure 10: Section view of custom pogo board sandwich of T4 with bed of nails PCB inside of a 3D printed enclosure.
Other benefits
Here’s a list of other benefits of using a LabJack for your embedded hardware production test setup.
- LabJack software isn’t open source, so your test code can remain fully proprietary.
- LabJack drivers can be bundled into your software package, so you can distribute (and thus version control) a single installer.
- Great product support.
- High expansion possibilities, including up to 80 analog inputs, direct thermocouple input connection, etc.
- OEM boards increase integration optionality and reliability.
- Scripting is awesome - basically you can simultaneously run a script on the LabJack while you also have code running in your test program on the PC, and they can work together asynchronously to meet test objectives.
- LabJack has been around for more than 20 years. The cost of getting stuck with an obsolete consumer grade board should be considered for things like this.
- You can source LabJacks from Amazon or Digikey, so you don’t have to request any favors from your purchasing lead.
Summary
We are partial to LabJack because ThermoDart engineers know how to use them already, but we would encourage any skeptics to pop open the Python example code and have a look. The LabJack T4 has been instrumental for our manufacturing test needs at ThermoDart, and at other companies, and we imagine that others have similar needs. As stated earlier, LabJack offers a good mix of I/O capability, software flexibility, and performance, all at a cost which makes it possible to instantiate several copies of the system without breaking the bank. For additional information on these pogo pin test boards, the software, or related, you can contact the author of this cross-post at contact@thermodart.com.